Markings on scales and measuring instruments compliant with the Measuring Instruments Directive
New scales and measuring instruments compliant with the Measuring Instruments Directive (MID) have the conformity marking shown in Figure 1. The marking consists of the CE marking, a supplementary metrology marking (M), the last two digits of the year when the marking was affixed (such as 17 as shown in the example) and the identification number of the notified body (such as 0000).
An incomplete marking (the number of the notified body is missing, for example) is not compliant with the requirements. Scales or a measuring instrument with an incomplete marking cannot be used for the purposes referred to in the Finnish Measuring Instruments Act.
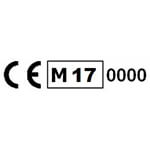
Figure 1. Marking indicating the conformity with the MID of measuring instruments and new scales manufactured after 20 April 2016.
Depending on the type of measuring instrument, the device may also have a type plate, which describes the measuring instrument’s purpose of use and the requirements on the operating environment in more detail.
Previous conformity marking for scales
Scales commissioned before 20 April 2016 and compliant with the requirements of the NAWI Directive have the marking shown in Figure 2. Scales equipped with the marking can still be used for the purposes referred to in the Measuring Instruments Act, as long as their verification is valid.
The marking indicating the conformity of the scales consists of
The CE marking with the last two digits of the year when the marking was affixed (14)
The identification number of the notified body (the example shown in the figure is 0000)
A black letter M on a green background.
If any of these are missing, this means that the scales do not meet the requirements of the NAWI Directive.
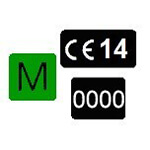
Figure 2. Set of markings indicating the conformity of scales. In this example, the scheduled verification of the scales must be carried out by the end of 2017 at the latest.
The instrument also has a type plate, which describes the scales’ purpose of use and the requirements on the operating environment, such as the accuracy class and operating temperature.
Finnish verification mark and seal
A measuring instrument verified while in service has the Finnish verification mark shown in Figure 3. The verification mark indicates the year and the month when the measuring instrument was last verified. The mark is shown on all measuring instruments after in-service verification.
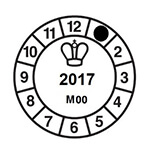
Figure 3. Mark indicating a completed verification. In this example, the verification was performed in January 2017.
This verification mark can also be found before commissioning on measuring instruments subject to requirements stated in the national legislation instead of the Measuring Instruments Directive or the NAWI Directive. If the verification mark on the measuring instrument is stamped on a lead seal, etched on glass or burned on wood, the month marking is not included.
At the time of verification, it is possible to close the parts of the measuring instrument that must not be tampered with after verification with a seal (Figure 4); for example, the parts that can be used to adjust the display and change the measuring result must be sealed. If the seal is broken, the verification is no longer valid.

Figure 4. A Finnish seal mark
Indicating the next verification date
In addition to the verification mark, it is possible to affix an informative, unofficial sticker to the measuring instrument, indicating the date on which the next verification is due (Figure 5). The informative sticker does not replace the verification mark or other markings indicating conformity.
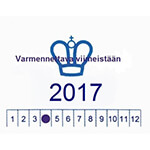
Figure 5. An example of an informative sticker indicating the next verification date. Usually, each inspection body has its own informative sticker. In this example, the next verification is due in April 2017 at the latest.
Finnish national type approval identifier
A measuring instrument can have markings indicating Finnish national type approval, if
it has been commissioned before the start of the application of the NAWI Directive (1990) or the Measuring Instruments Directive (30 October 2006)
- it is not under the scope of application of either directive in any way.
Usually, type approvals are valid for 10 years after the type approval was granted. Out of the measuring instruments included in the Measuring Instruments Directive, measuring instruments compliant with the old type approval could be commissioned until 30 October 2016.
Measuring instruments with type approval have a type plate, which shows the type approval identifier, among other things. The format of the Finnish type approval identifier is VJ.Z.XX.YY, where Z is the equipment type identifier (table), XX is an annual sequential number, and YY is the last two digits of the year when the marking was affixed (for example, VJ.E.1.94 indicates the Finnish approval of a cold water meter). The acronym VJ comes from the words ‘Vakaus/Justering’ (calibration).
Table: Finnish identifiers of different types of measuring instruments
| Instrument type | Z |
|---|---|
| Scales | no letter |
| Meters for liquids other than water | A |
| Height meters | B |
| Grain moisture meters | C |
| Measuring systems for liquids other than water | D |
| Cold water meters | E |
| Flow sensors for thermal energy meters | F |
| Temperature sensor pairs for thermal energy meters | G |
| Counters for thermal energy meters | H |
| Gas measuring systems for vehicles | K |
EC markings under old directives
Measuring instruments compliant with old directives could be commissioned before 30 October 2016, if the old type approvals were valid at the time of commissioning. The use of measuring instruments that have been verified and type-approved in accordance with EC directives may continue, if the approval is valid when the measuring instrument is commissioned and if the in-service verifications have been performed appropriately.
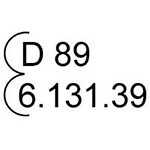
EC type approval marking (in this case, D 89 refers to Germany 1989) as well as approval indication (in this case, 6.131.39). Such markings can be found on water meters, for example.

EC initial verification mark. The lowercase letter ‘e’ contains the identifier of the country and area in the top half and the identifier of the body performing the verification in the lower half. The marking inside the hexagon indicates the verification year.
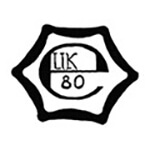
An alternative EC initial verification mark for measures of length.
Figure 6. EC markings under old directives.
Markings on alcoholic spirits measures
New alcoholic spirits measures must be placed on the market in accordance with the Measuring Instruments Directive, in which case they have the marking shown in Figure 1. Alcoholic spirits measures that are in use may still have the initial verification mark shown in Figure 7 that consists of a picture of a crown, the last two digits of the verification year (such as 06), and the number of the body that performed the verification (xx).
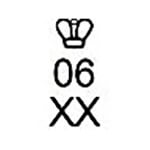
Figure 7. Markings on an alcoholic spirits measure
Indication of the place of use of scales
The marking indicating the place where the scales are used states the location, in which the scales were verified, and the longest permitted distance the scales may be moved in the north-south direction. The restriction on the place of use of the scales is due to variation in Earth’s gravity, or the g value.
Earth’s gravity affects the measuring results of most scales. The value of gravitational acceleration varies a certain amount in different parts of Earth, which means that most of the accurate electrical scales must be verified either at or for the location where they are used. The verification can be performed in two phases: the notified body issues a certificate on the measures performed in the first phase, and carries out the checks that may be affected by the installation and location of the scales in the second phase. The verification will only become valid after the second inspection is complete. After this, the verified scales cannot be moved very far, particularly not in the north-south direction, or the systematic error becomes too large.
Indication of a rejected measuring instrument
If the measuring instrument was rejected during verification, the red rejection sticker shown in Figure 8 is affixed to the instrument. At the same time, the body performing the calibration must destroy the verification mark. If the measuring instrument is broken or its readings exceed the permissible error margins, the instrument can no longer be used, even if the next scheduled verification is not yet due. The instrument must be repaired, readjusted and verified. If the repair and readjustment is performed by an approved repair shop sealing the instrument with its own mark, the instrument may be used until the next scheduled verification.

Figure 8. A rejection sticker used to mark rejected measuring instruments.