Scales intended for weighing precious metals
When you buy and sell precious metals, i.e. gold, silver, platinum or palladium by weight, you must use verified precision scales with a valid verification for the weighing (Measuring Instruments Act 707/2011, decree 1431/2016). Both the consumer and the seller benefit from the product being measured and priced correctly. Reliable measurements and correct handling of the scales guarantee fair trade, when everyone follows the same rules and the competition remains fair.
The entrepreneur, such as a buyer of scrap gold, is responsible for ensuring that the scales are suitable for the intended purpose and that they are appropriately maintained and verified.
Scales that are compliant with the requirements and identifying them
Precision scales that can be verified and at least in accuracy class II, suitable for the intended purpose, must be used for buying and selling precious metal products. The scales must be already verified when purchased.
The requirements of the Measuring Instruments Act are fulfilled by using scales compliant with the NAWI Directive (2014/31/EU). The scales must have the manufacturer’s declaration of conformity.
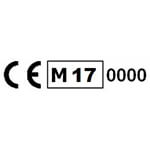
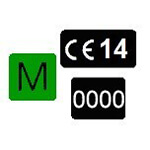
Approved scales must be equipped with the marking shown in Figure 1 or 2. The marking consists of a CE M mark, the last two digits of the year of manufacture, and the number of the notified body. An incomplete marking (the number of the notified body is missing, for example) means that the scales are not compliant with the requirements; such scales cannot be used. Scales in accuracy class II are equipped with the marking shown in Figure 3.

Figure 1. Marking indicating the conformity of scales (scales commissioned after 20 April 2016)

Figure 2. Marking indicating the conformity of scales (scales commissioned from 1990 to 20 April 2016).

Figure 3. Mark for class II precision scales
The weighing area and durability of the scales must be suitable for their intended purpose and operating environment. When purchasing scales, issues such as the temperature range, accuracy class and minimum and maximum weighing area of the scales must be taken into account. This information can be found on the type plate of the scales.
The scale interval of the display of the scales should be 0.01 g or less. No unverified measuring instruments or measuring instruments that cannot be verified may be kept at the place of sale.
There may still be old precision scales, such as equal-arm balances, in use that have the old national approval mark, the VJ mark. These scales can still be used to determine the price, if the appropriate in-service verification has been performed on the scales and possible weights.
Placement of the scales at the place of sale
Place the scales so that both the seller and the buyer can see the weighing result.
Moving and handling precision scales
Precision scales are verified for the location where they are used. If the scales have an internal tuning system, they can be moved to another location for use without a new verification and then tuned at the new location.
This is due to the local variation in the acceleration of Earth’s gravity (g value). Because the g value affects the weighing results of precision scales directly, it must be specified correctly when the scales are verified.
Use the scales according to the manufacturer’s instructions. The scales are a precision tool, and they must be handled with care during transfers. The scales must be placed on a stable, vibration-free base and adjusted so that they are level. There must not be any air currents at the location that could cause a disturbance. Allow the scales to warm up sufficiently before use in accordance with the manufacturer’s instructions. If the scales have an internal adjustment weight, the calibration in accordance with the instructions of the scales’ manufacturers must be completed.
In-service verification
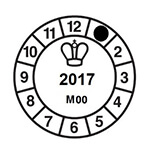
Take care of the reliability of the scales while they are in use: keep the scales in working order and verify them every three years. The first scheduled verification must be performed on the scales 3 years after the time of manufacturing marked on the scales. The scales are verified by an approved inspection body.

Figure 4. In-service verification mark. In this example, the verification was performed in January 2017.
Weights
If weights are used to weigh precious metals, their verifications must also be in order.